Showing posts with label digital making. Show all posts

Tuesday, April 23, 2024

STEM Lab 23_24 Round 6

As you have no doubt come to expect, the penultimate round of STEM lab for the year was awesome, just as its predecessors were. There was a great deal of programming going on this time. Kindergarten and 1st grade returned to their Code.org courses, while 2nd grade took their first steps in the full version of Scratch. The third graders had their first experiences coding the micro:bit microcontroller. Meanwhile, our 4th and 5th graders extended their micro:bit skills by incorporating the device into creative projects.


Kindergarten & 1st Grade

You may recall that the Kindergarten and 1st grade students begin the year in Code.org. The puzzle-based nature of the activities help the students develop their algorithmic thinking skills while also giving them valuable practice with programming concepts like loops and events. Most of the programming activities we do later in the year, such as Scratch Jr and Robo-mouse, have a more creative lean to them. I try to strike a balance between formal coding instruction and creative coding projects so that students not only learn the programming concepts, but also see programming as a tool they can use to express themselves and share their learning. This round was not all Code.org however, as we also did a day of Scratch Jr and completed a building challenge.


2nd Grade

The end of the year is always one of my favorite times with 2nd grade. That is when I introduce them to the full version of the Scratch programming language. Scratch was designed to have a "low floor", so even students who have not programmed before can get started with relative ease. Most of our students have been programming since Kindergarten and are very excited to start using "real" Scratch. I start each class with a code-a-long activity in which I show them some of the similarities and differences between Scratch and Scratch Jr. Following that guided tour, students have some time to explore the new coding environment and to try things out. They very quickly find that there is a lot more to Scratch than there was in Scratch Jr, and this discovery leads to some productive struggle as they work to understand how to create the movements, effects, and sounds they want for their projects. For the rest of the week students work through a set of tutorials embedded within Scratch that teaches them how to use the most common events and commands. I encourage them to put their own creative spins on the tutorials as they go. In rounds 7 the students will complete their first multi-day Scratch project and I cannot wait to see how they do.

3rd Grade

This round the 3rd grade was introduced to the wonderful world of microcontrollers with the BBC micro:bit. They learned that a microcontroller is the perfect device for when you need a computer that will only have one job, such as turning street lights on at night and off in the morning, or opening the doors at the grocery store as someone approaches them. The micro:bit has a number of inputs including buttons, an accelerometer, and sensors for light, sound, and temperature. All of these can be used to generate outputs like images or animations on the LED screen or sounds from the speaker. We spent the first few days of the week practicing with the various inputs and outputs. Thursday and Friday the students were challenged to build a model animal and to use the micro:bit to make their model interactive. The results of the Micro:pet project are always outstanding. Some groups used the device as their animal's mouth and others as its whole face. One group used animations on the micro:bit's screen as the tail of their model cat. 

4th Grade

Fourth grade used the micro:bit earlier in the year in a unit that was a kind of "next steps" continuation of the unit the 3rd graders did. They learned to use the micro:bit's input/output pins, more of the device's sensors, and generally created more complex programs. In this round the students used the micro:bit in conjunction with a breakout board kit called Crazy Circuits from Brown Dog Gadgets. The breakout board gives one easy access to the full array of pins on the micro:bit. The kit includes additional hardware like LEDs that students can connect and program. This is the first time we have used these kits in the lab so there was a bit of trail and error as we worked out the best ways to employ them. We worked it out though and at the end of the week the students used the a selection of Legos to build a scene from a story of their choosing which they then animated with the micro:bit and the breakout board components. While there was a bit of frustration at the limited Lego resources the students were given, that constraint by and large inspired creative work arounds.

5th Grade

In keeping with this round's micro:bit theme, 5th grade used a different breakout board and handful of components to create "moving masterpieces" or "animated artworks". We started the week by learning to wire LEDs and a servo motor to a breadboard. Most of the students used breadboards last year and were familiar enough with them to assist those who are new to Sinclair this year. Once the wires were all in place, students coded the LEDs to blink and the servo to rotate on a button press. They used this program as a starting point for their projects later in the week. I showed them one example project, my personal riff on Van Gogh's Sunflowers with a couple blinking LEDs and a moving butterfly, and then instructed the students to think of what they wanted to create. I made a few suggestions like book covers, scenes from movies, or some random silliness, but left the final decision to them. (I do not like to give the students too much direction for fear of stifling their creative process.) Over the next few days the students, some working independently, others with a partner created their image, mounted it to a file folder, added the LEDs, servo, and wires to the breadboard. They tweaked the original program to incorporate more LEDs or multiple servos, and to make the lights and motion fit with their vision. I was not disappointed with their work... so much impressive creativity!


Tuesday, December 12, 2023

STEM Lab 23_24 Round 3

We have had another awesome round in the STEM lab. From storytelling with robots to miniature museums, the students have created outstanding projects. 

Kindergarten & 1st Grade

Our youngest Superstars returned to computer programming this round. This time however, there were no screens involved in their coding. Rather, the students wrote programs for a pair of robots; the perennial favorite, Robo-Mouse, and exciting newcomer, Bee-Bot. Students built mazes of increasing complexity for Robo-Mouse to navigate. With the Bee-Bots, students creates sets and costumes and programmed the robot to act out the main events of a story. 

There is a saying of uncertain origin among computer programmers that goes something like this: the good news about computers is that they do exactly what you tell them to do, the bad news about computers is that they do exactly what you tell them to do. Of all the coding activities I do with students, none evokes the spirit of this aphorism more than this robotics unit. The number of times I have heard some variation of the phrase, "I programmed it right, but it's not working" from the students during robot week is beyond reckoning. However, I do not think any unit in the whole of the STEM Lab curriculum I have created more completely drives home for students the importance of clear, orderly commands when coding than this one. 


2nd Grade

One of the best things about being the STEM lab teacher is the mandate to create learning opportunities that allow students to discover the connections between the different content areas. The Math Stories unit is a favorite of mine for a variety of reasons. One of those reasons is that thing I miss about being in a regular classroom is getting to teach books on a regular basis. Another one of the reasons is chance to let students play with and explore math concepts which is sadly not a regular part of the standard issue math curriculum. The books I chose for this year's 2nd grade math stories unit were: A Remainder of One, One Hundred Hungry Ants, Grandfather Tang's Story, and Perfect Square. The first 2 titles explore ideas related to multiplication and division while the other two are an opportunity to play with geometry. 


3rd Grade

Third grade also returned to computer programming this round. This was the first half of a two part project that will combine both digital and physical elements. Inspired by my National Geographic and Lindblad Expeditions Grosvenor Teacher Fellowship this past summer, students researched an arctic animal, taking notes on its habitat, behaviors, and the challenges it faces. They created a Scratch project to share what they learned from their research using pictures from Britannica and National Geographic to illustrate the facts they included. 

This is the first project that I have the students do in which they use Scratch to create a product with a specific purpose. It is when I teach them to add pictures to their Scratch programs and when they learn about key press events. In the next round they will create a poster about their selected topic and wire it to a Makey Makey that will allow users to control the Scratch project by touching different parts of the poster. When everything is complete they will share their projects with a visiting class and administrators. 

The Scratch projects are in studio that can be viewed here. Please note that some of these are works in progress.


4th Grade

The fourth grade classes wrapped up their biography projects this round and presented their work to visiting 2nd grade classes. Previously the students researched the life and contributions of a chosen historical figure. They had a variety of choices ranging form artists and composers to inventors and scientists. In this round the students put the finishing touches on the Scratch projects they created last time in the lab and built a model of their subject using a plastic bottle, cardboard, and construction paper. At the end of the week they connected their models to their Scratch projects with our old friend Makey Makey and presented their finished products. Not only was I proud of the amazing job the 4th graders did explaining their work to our visitors, but I was so impressed with how the 2nd graders grilled their hosts with questions about the historical figure, the working of the Scratch project, and how the model was constructed. 


5th Grade

The 5th grade also completed the second half of a larger project this round and presented their learning. This project too was inspired by my Grosvenor Teacher Fellowship expedition. Students researched the arctic ecosystem and the issues facing the natural and human communities of the region in the previous round and programmed a digital museum room using Scratch to share what they had learned. In this round they constructed a miniaturized physical version of their digital museum exhibit. The door to this model was wired to a Makey Makey so that opening it triggered the Scratch project to begin narrating the contents of the museum. At the end of the week the students shared their work with visiting first graders and administrators. 


Tuesday, December 20, 2022

STEM Lab Round 3

It has been another great rotation in the STEM Lab! We have done a lot of programming, some building, and also gotten into some physical computing. Read a bit about what each grade level has been up to the last few weeks.

Kindergarten & 1st Grade

You may recall that Kindergarten and first grade started the year working on computer science and programming courses in Code.org. These puzzle based lessons are great for teaching concepts and helping students practice skills, but there is not much scope for student creativity. That is where Scratch Jr comes in. 

Scratch Jr is new to most of the Kindergarten students so we start with a refresher on what it looks like to write a program in Code.org (which they used at the start of the year) and compare that to the Scratch Jr environment. Each day I show them what they will be programming and talk about the command blocks they will be using. Then the students go to their seats and we code together. They are allowed to choose their own characters and backgrounds, but they copy my code at this point. When we finish coding together the students have what we call "creative time" when they are allowed to change their program and project by adding or deleting characters, choosing new backgrounds, and writing new code. 

The first graders who attended Sinclair last year are familiar with Scratch Jr, though there are always a few new faces, so we start with just a brief review the programming environment. The daily lesson outline is fairly similar however. I talk them through the day's program as I show how it is built. That is followed by the code-a-long and then creative time. In first grade I teach the students how to change scenes and use the message events to coordinate the actions of the characters so that they do not all run their code at the same time.

Throughout this round I was quite impressed with the creative projects the students in both Kindergarten and 1st grade created. They did a wonderful job of creating personally meaningful scenes and stories while quickly grasping the programming concepts necessary.


2nd Grade

The work Kindergarten and 1st grade did in Scratch Jr lays the groundwork for the digital diorama project 2nd grade completed in round 3. On their previous rotation through the STEM Lab, 2nd grade conducted research into an animal and took notes about it in their journals. The next step had them use those notes and the Nat Geo Kids website to guide them as they drew pictures of their animals and their animals' habitats. We talked about the elements of scientific drawings (big, colorful, and accurate) as well as being comfortable with one's best effort (it doesn't have to look like a photograph). These elements were photographed into a Scratch Jr project, the habitat as a background and the animals as characters, to create the dioirama. Students then programmed their characters to move around and to talk sharing facts about the chosen animal. 

I do some variation of this project most years. It serves as the first STEM lab project students complete that involves research along with both digital and physical elements. Most of the projects students work on in 3rd through 5th grades are patterned on those pieces, so I like to get the 2nd graders ready with projects like this one.


3rd Grade

This round 3rd grade embarked on the first of a 2 part project. Part one has the students creating a Scratch project that teaches the user about a topic. The project must use key presses to activate the various parts of the program because in part 2 they will design and build an intereactive poster that will connect to the Scratch project using the Makey Makey. I presented them with a list of topics from the 3rd grade science curriculum. Students chose either to work alone or with a partner and then used resources like Brain Pop and Britannica to research the topic selected from the list. Once their notes were complete I showed the students how to plan their projects. The basic formula is key press plus picture plus facts. That is, each key press should display a picture related to the topic and share facts relevant to the image. I had the students begin working on their projects before teaching them how to find and add pictures.

The studio of projects can be found here. (Disruptions caused by baseball, boil water notices, and fundraiser rewards mean that some of the projects are more of a work in progress than others.)

4th Grade

The Micro:bit has been an important piece of technology in the STEM Lab for some time. Fourth grade returned to this small but mighty microcontroller for round 3. Last year when they were introduced to the Micro:bit, students worked on making use of the basic inputs and outputs of the device and on becoming comfortable with the block-based programming environment MakeCode. MakeCode feels familiar because it akin to Scratch. However, the structures are different and can take some getting used to. We started the unit with a review session meant to refresh the memories of the students who used Micro:bit last year and to initiate those students new to Sinclair this year. Over course of the week students learned to used the Micro:bit's input/output pins to light LEDs. They used the environmental sensors (light level, temperature, sound level) and conditional statements to generate outputs that vary depending on the sensor input. The accelerometer (tilt sensor) was used to sound different notes based on different tilt gestures. The challenge was then to use the Micro:bit to play Twinkle, Twinkle Little Star. 


5th Grade

Fifth grade completed and presented their mini museum projects this rotation. In the prior round they used Scratch to build and program a digital museum room, complete with virtual docent to narrate, about a self selected and research topic. This time out they built a physical version of their room and the objects within. They used copper foil tape to built a circuit on the room's door which was connected to their Scratch projects with a Makey Makey. Openning the door to the physical room closed the circuit and triggered the virtual narrator to begin describing the objects in the room. Most classes got the opportunity to present their projects to visiting 2nd grade classes and administrators. The Echo magnet group also had the opportunity to share their work with Houston ISD Chief Academic Officer Dr. Bird and members of the Instructional Technology Department.

The Mini Museum Room Scratch projects can be found in this studio and a sample video of presentation day is below.


Wednesday, February 5, 2020

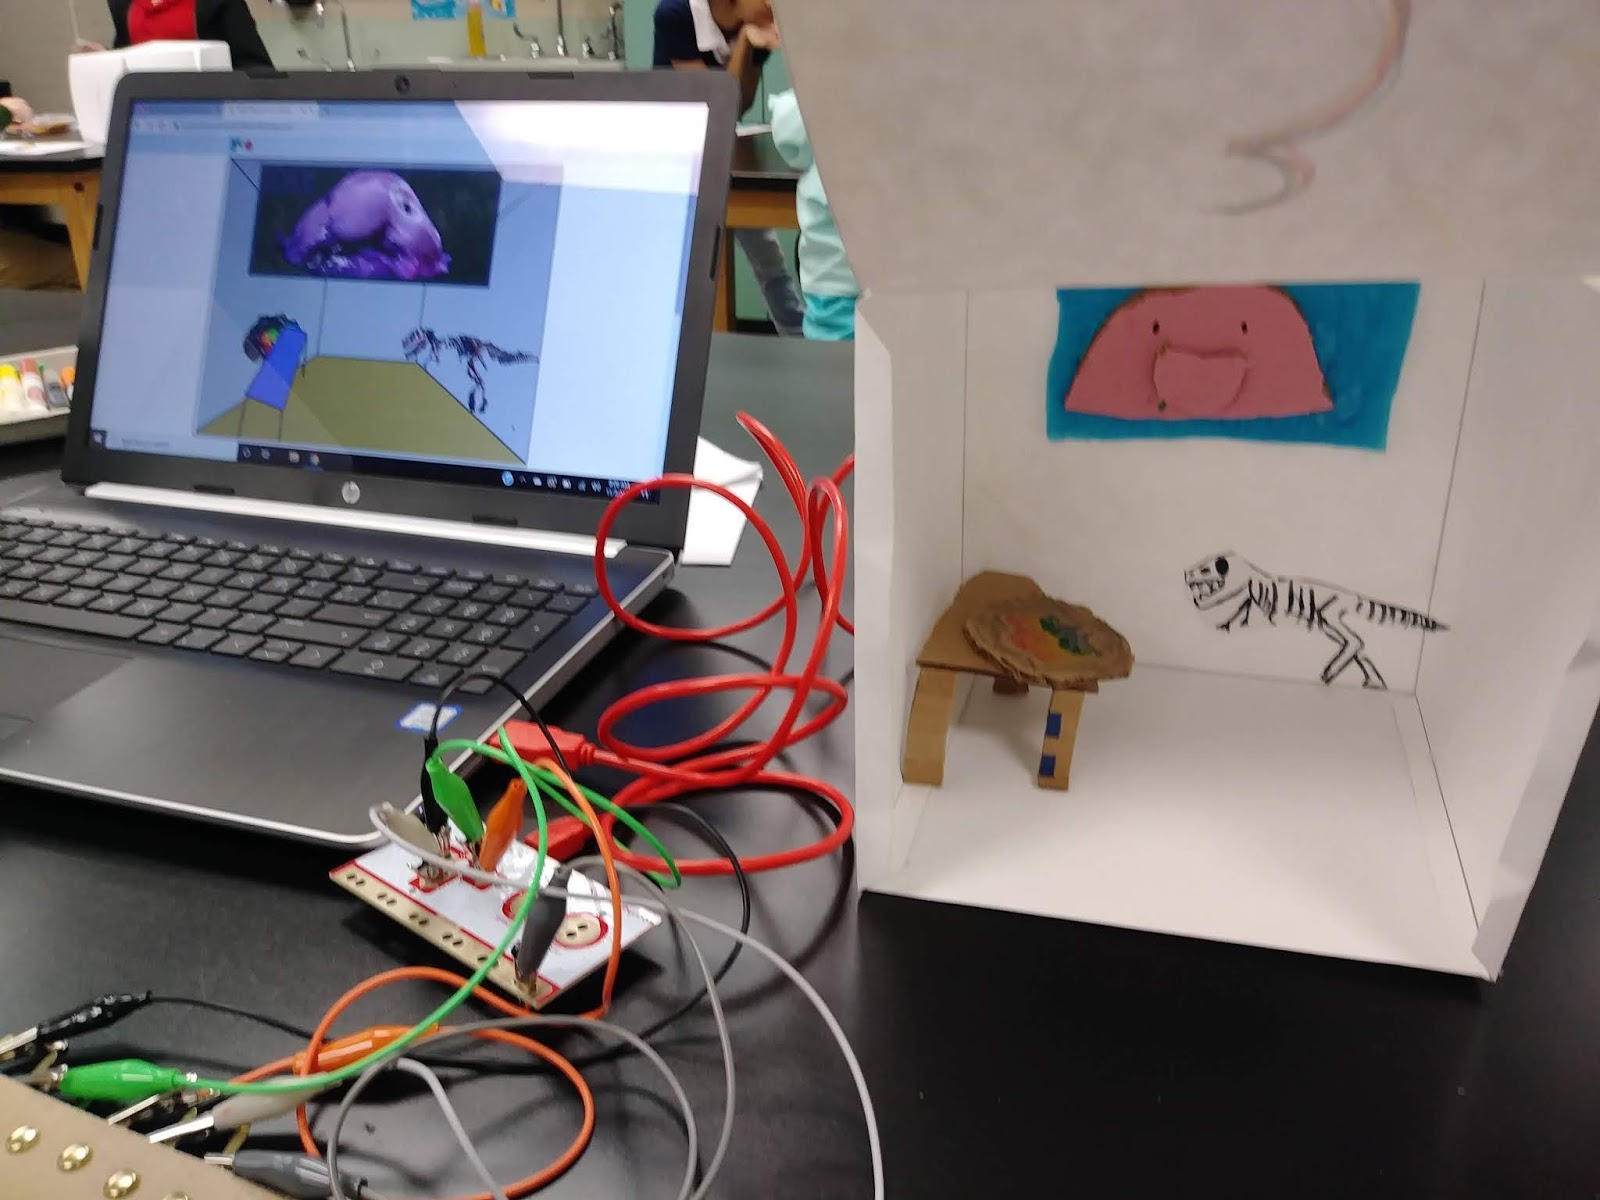
Digital Dioramas and Skype-a-Scientist

This rotation in the STEM lab has the second grade taking their first steps into combining physical elements with digital ones to create projects. In my almost entirely self-designed curriculum, this kind of fusion is the ultimate goal for the students I work with. 
The students began by selecting an animal to research using the National Geographic Kids page about different species of animals. I let them explore an bit before choosing and starting to take notes in their journals. They also selected partners for this project. I provided the students with a list of facts that they needed to read for and record in their notes, but also encouraged them to include any information that they found especially interesting. Required information included what their animal eats, where it is found, and what threats it faces. We discussed how threats may be natural (predators) or human-caused (habitat loss/ poaching). Finally, they drew a picture of their chosen animal and its habitat in their journals.

Next, the teams worked together to create detailed drawings of their subject animal, its food, and its habitats. They cut out their pictures and practiced animating how they would move around in a Scratch Jr. project. Students used the camera function to photograph the pictures they drew of the habitats as backgrounds. They also added photos of their animal drawings as well as drawings of what it eats and the threats it faces.

Finally, the students programmed their hand-drawn characters to move around and to share facts they gathered through their research. This process was a great opportunity for me to teach the students about a number of different computer science concepts. They are already familiar with the primary event block in the Scratch Jr language, the Green Flag. This event is a general purpose "go" to all of the characters students have added to their programs. However, most of the teams discovered that the Green Flag event has its limitations because it makes everything move at once. When they wanted different characters to move and speak at different times I showed them the messaging events. When they wanted a prey animal to disappear after being eaten, I was able to show them the uses of the "when characters touch" event which is the beginning of understanding conditionals. 


We finished the unit by having each student team share their work on the SMART Board so they could practice providing each other feedback.

Another element of this unit that I personally find super exciting is our video chat with a scientist. This is facilitated by Skype-a-Scientist, a program that matches classrooms with scientists working in a variety of fields. Skype-a-Scientist connects teachers and scientists and they coordinate the scheduling of a video call. This program lets students see and engage with "actual living scientists" who were once sitting in a classroom as they are now. Each class gets to speak to a different scientist with a different area of study, so each conversation is unique. The first group spoke with a conservation biologist in Seattle, and the second group will be speaking with a geologist from the UK. Skype-a-Scientist is a non-profit run by Dr. Sarah McAnulty. I am proud to support this program with a monthly donation, and I would encourage our Sinclair Elementary families, and anyone else who cares about supporting science education to do the same at patreon.com

Friday, January 3, 2020

Two for One Blog Post - Interactive Posters and Math Stories

The run up to the winter break is is always a busy time. Mine was even busier than usual and the first casualty was my blog posting schedule. So this one will wrap up the work done by the kindergarten, first, and third graders during cycle 2. Then I'll be all ready to go when cycle 3 starts in another week.

Third graders got their first taste of true digital making during this rotation with the interactive posters project. Each class had a different set of research topics to choose from. I try to do this with all of my groups and grade levels. It gives me the chance to see how well various topics work for a particular project. Also, speaking for myself, I like to have some variety in the projects over the course of the unit since I am implementing the same lesson plan 4 times in a row as the classes rotate through the lab. The choices ranged from recycling and energy conservation to birds and fish to objects in our solar system.

Students had the option to work independently or with a partner. They researched their chosen topic and recorded notes in their journals. They then planned a Scratch project to teach about their topic. The plans needed to include backgrounds and sprites they would use, what facts from their research went with each background, and how the sprites would move and talk. I introduced the students to computer programming vocabulary like "event" and "comment". Events are a key part of how their programs for this project operate and commenting one's code is a good habit to get into and one I have been lax in training my students in acquiring. The students also learned how to add pictures from other sources to their Scratch projects. An important part of this is finding pictures that are open source and giving proper attribution in the project notes.

Teams start on the Scratch project together so that both partners are familiar with the basics of its function. After a day or two one partner steps aside and begins work on a poster that complements the Scratch project. When the poster and program are complete, brass fasteners and copper foil tape are added to the poster to create touch points that can be used as key press events to run the various parts of the Scratch program. Turning these conductive materials into "buttons" is achieved by using the Makey Makey input/output board. It is essentially a keyboard connected to the computer via USB without any keys. Wires with alligator clips connect the poster to the Makey Makey which, once plugged into the computer, allows the brass fasteners on the poster to function as key presses when touched.

One of the things I have come to love most about teaching in the STEM lab over the last 5 years is the pure excitement and wonder that students express the first time they try out something made interactive with the Makey Makey.

I wrote a guide to this interactive poster activity that can be found here on Instructables.

Kindergarten and first grade had a unit that centered on math and literacy. Each day we read a story in which some kind of mathematics is involved, different books for each grade level, and then worked on an activity related to the math concept from the book. The books vary a little from one class to the next. Partly that is because of the various interruptions like fire drills and holidays that occur, and partly it is because I do not own a copy of all of the books I would like and have to request them from the public library. Regardless of the books read, the math concepts covered are generally the same. We touch on things like doubling and skip counting. We look at strategies for decomposing and grouping numbers. There is always some measurement and some geometry as well.

I have done some form of this unit for the last few years in the lab and it is always one of my favorites. This unit was born out of my realization that after a couple of year out of the regular classroom I missed teaching literacy, and more specifically books, to my students. My two week units do not allow me to teach novels like I used to, but this unit gives me the chance to read with students again. More importantly, I get to make clear to them the connections between mathematics and literacy that I fear they miss during their classroom reading block.


Friday, November 22, 2019

Morning at the Mini-Museum

This rotation in the STEM Lab has 4th grade working on a project that combines digital and physical elements to make an interactive display. I adapted this activity from one done by a teacher I know in Virginia. (Link to her project guide is below.) I was overly ambitious in my additions for the first group, so some adjustments and refinements were necessary after the first class completed their projects.


On the first day of the unit, students went on a virtual field trip to the Smithsonian Museum of Natural History. The "wandered" around the museum recording observations in their journals regarding the things they saw, how the objects were displayed, and anything else that they found interesting. We followed up with a discussion about what the purpose of a museum is. The students gave several great responses including: "so people can learn and discover things", "so people can see things they have never seen", and "so people can learn about life in the past". That day finished with students brainstorming a list of things they would include if they could design a room in a museum.


The next day, I explained the project to the class. They were to plan a museum room that included 3 objects of their choosing. Each person would build a model of their imagined room using the STEM Lab staples of cardboard, glue, and construction paper. Students would work with a partner to use Scratch to program and digital version of each partner's room that used by key press events to switch between rooms. The rooms are narrated giving at least 2 facts about each object included. Finally, the model museum rooms would be linked via the Makey Makey to the team Scratch project so that when the door to each room is opened, it causes that part of the program to run.


I gave the students a fair bit of leeway in what they added to their museums. This was so that they could include objects representing personal interests and passions. The only requirement was that they be able to give two facts about each object in their rooms. It has been interesting to see what objects the students have included. Some rooms are full of fancy cars or sharks, while others have favorite foods and athletes. The attention to detail that several students added to their physical models. As always, I have been really impressed by how the students helped each other to complete the elements of the project on time. For some, the coding comes more naturally and for others it is the building. I love how they all work together to ensure that everyone's project is finished on time.

I try to mix it up each year in the lab and to not repeat projects too often, but I am loving this one so far and can it it becoming a regular part of the lab curriculum.

The guide by Kathleen Fugle is here: Tiny Museum on Instructables.

The gallery of our projects is here (more added soon): Mini-Museum rooms.


Sunday, October 13, 2019

Biography Bottles

By the time students get to the 5th grade, their projects have both physical and digital elements. That is, their final products include some computer programming and something they made with their hands using generous amounts of glue and/or tape. Another consistent element of the 5th grade projects is that the students are creating something that shares their knowledge, thoughts, ideas, and understandings on a selected topic. I select a broad category and the students select a topic from that category to be the subject of their research.
The first unit this year is biographies of notable women (mostly women anyway) from STEM related fields. I selected 6 subjects for each of the 4 groups of 5th graders to choose from. There was some overlap from group to group, but always some variation as well. Ideally each group would have had an entirely different set of people to choose from, but I was limited by what is available on the digital research tools available to the students. The problem with trying to introduce students to lesser known (but no less important) women and people of color in STEM is that there are not as many resources for them to use to gather information.

Students had some time to research their choices because there were always a few who they had never heard of. They selected a person they were interested in studying and set about gathering more information on that person's life and work. The students were also able to decide if they wanted to work with a partner or go it alone.


(The project in the video above is one of many excellent final programs. This one is about Rachel Carson, see the whole project on Scratch: here.)

The final product had two parts. The first was to create a Scratch project that told about the life of their selected topic. Students had to include an image of their person, basic biographical data, information about their education, and the significance of their work. The second part of the project was to use a plastic bottle, cardboard, construction paper, and various other crafting supplies to build a model of the person they researched. They were to try make their model look as much as possible like the person they studied. It is no mean feat to turn a plastic bottle and construction paper into recognizable portrait of Ada Lovelace or Grace Hopper, but I am always impressed by how well the students manage this challenge.

As students progress through the lab over the course of their elementary careers, it is my goal to train them to see every material that I put before them, be it a cereal box or a computer as a tool for sharing their ideas, expressing their thoughts, and building personally meaningful projects. I give students as much choice as I am able to without overwhelming them. By giving them choices and providing an array of flexible materials, though they are working on a similar task, there is a wondrous variety in the final products. The studio where the students are sharing their Scratch projects is linked below.

Scratch Biographies Studio

This project is based on an project by K. Boyce, instructions can be found on Instructables.


Saturday, September 14, 2019

Starting with Scratch

It has been a great first rotation in the lab! So much amazing making and learning is happening, and I will write about it all in due course over the next several weeks as new classes pass through the lab.

I want to start with the third graders for this post. Third grade begins each year by being introduced to the Scratch programming language and the associated online community. Students do finish their second grade year at Sinclair with a taster course in Scratch, but this is their first exposure to how the upper grades in the lab function.

We start with a lesson on proper digital etiquette with some videos and class discussions. The students learn about their digital footprints, and how to leave appropriate comments. Cyberbullying is also discussed. Students take notes in their journals to use later when they plan their final projects.

Before students are presented with their Scratch login credentials, we do a brief tour of the online community. We go over how to share and unshare projects, how to complete the project page, how to leave comments, and how to report bad behavior. That done, the students login an have some time to explore and create in their accounts. Over the course of the unit, I do give some direct instruction on how to use certain coding structures, but I also provide the students time to experiment. Problem solving is part of the learning process so rather than just tell students how to do everything, I am more likely to ask them guiding questions to help them move in the right direction.

Students worked independently or with a partner to plan a project that would share at least 2 dos and 2 don'ts of digital etiquette and online behavior. They made organizers in their journals showing the behaviors and the reasons why that behavior is acceptable or not. They also sketched the look of their project and the sprites they intended to use. Students had several days to work on the creation of their projects. I met with each individual/group to discuss their progress and offer feedback. As students finished their projects they learned how to add them to a class studio where their work could be viewed about the whole class. I left comments for each project and students practiced their digital etiquette by leaving helpful comments for each other.

This is is one of my favorite units each year just because of the unalloyed excitement of the students. Those who have been at Sinclair for a while have visited the lab to see projects created by older students using Scratch. This unit makes them feel like "the big kids" and they are overjoyed about it. For me, I am most excited about the endless array of possibilities Scratch opens up for the students. Scratch Jr. is wonderful tool, but Scratch has a far greater number of programming tools with which students can create. They can compose music, draw pictures, connect with hardware, and work with data structures like variables and lists. I cannot wait to see what these students will create this year as their skills grow!

Here's the studio where all of the projects are posted.


Sunday, February 17, 2019

Animated Artworks

It has become my habit in the STEM Lab to experiment, so to speak, on the 5th graders. When I devise a new project or new activity or practice, I find it useful to try it out on the group of students who will have gone on to middle school next year. That way, the necessary tweaks and alterations can be made for the following year. This unit is not entirely mine as much is adapted from a number of different activities I have seen done by my various Twitter friends.


Having said that, this is very much an experimental unit in which the 5th grade has been working. It is no secret that I do all that I can to bring concepts and skills from other subject areas into my lab projects. I have wanted to implement a unit with a fine arts focus for a while, and I felt like the 5th graders finally had the requisite physical computing skills to be successful. The project involves students creating their own interpretations of a famous artist's work, both digitally and physically.

Students started by doing some research into the life and work of a particular artist. The first two rotation groups got Vincent Van Gogh (because the first group was shorted 3 days due to various interruptions) and the third group is at work on Claude Monet. (I have not settled on an artist for the last group, yet.) These were chosen because they have a wide range of works to choose from. Students selected a work and sketched it into their notes. This gave me the chance to teach some basic drawing techniques which was a novel experience.


Next, students used Scratch to create an animated version of the painting they selected that also shared information about their artist. First they had to download an image of the painting. We used Wikimedia Commons for this because the images are free to use with attribution (which is another thing I have been working to get students in the habit of, citing their sources). They then uploaded that image into Scratch as a background. All of that is something they have learned previously. The next bit, however, took a little practice. They uploaded the image of the painting again, this time as a sprite and used the paint editor tools to erase most of the painting, leaving only the piece they intended to make move with code. In Van Gogh's "Starry Night" this may have been the moon or the clouds, in Monet's "Tulip Field" it was the flowers or the windmill blades. That sprite was then placed exactly over its corresponding place on the background so that it would only appear as a separate element when then triggering event key was pressed. Students repeated this process until they had at least 3 different animated elements in their chosen work. They also added a sprite that told about the life and work of their artist.

Here are a few example projects:
Van Gogh, Irises
Van Gogh, Starry Night
Monet, Boat on the Epte

The second part of the unit moved us into the realm of physical computing with the Raspberry Pi. First I introduced students to the Explorer HAT add on board. It is a self contained set of inputs and outputs capable of running both LEDs and motors. It has a small breadboard (which students learned to use last year) on top for building the circuits. Students are able to program the lights and motors using Scratch, albeit an older version which takes a bit of getting used to for them. Armed with their upgraded skills, students worked in teams to use the Scratch paint editor to create a digital interpretation of their chosen painting. This too takes some practice, but it also allows them to get creative with how they accomplish the drawing. Some use the shape drawing tools and fill them with color, while others use the line drawing tools. Meanwhile, the other partner is drawing the same painting on paper with colored pencils and markers. Both drawings done, the physical and the digital, teams added 2 LEDs to different places on their drawing, wired them to the Raspberry Pi, and programmed them to light up on different key presses. They also drew and cut out a detail from their painting, attached it to the the axle on a motor, and added the motor to the drawing as well. This was programmed to spin on a key press. The lights and motors matched elements in their digital drawing that they had animated on screen, similar to what they did during week 1. They also added a sprite to talk about the artist and the painting.

At this point the rotations are about half over and I am generally pleased with how it has gone so far. I think for the future I will create a gallery of paintings and artists for the students to choose from. Hopefully that will lead to a greater diversity of projects in the gallery.